In Command, Part Two – British Empire in Italy list building ideas

In the last article we looked at the different cards available to the British Empire and its free forces allies. In this article we will have a look at the forces you can build with them.
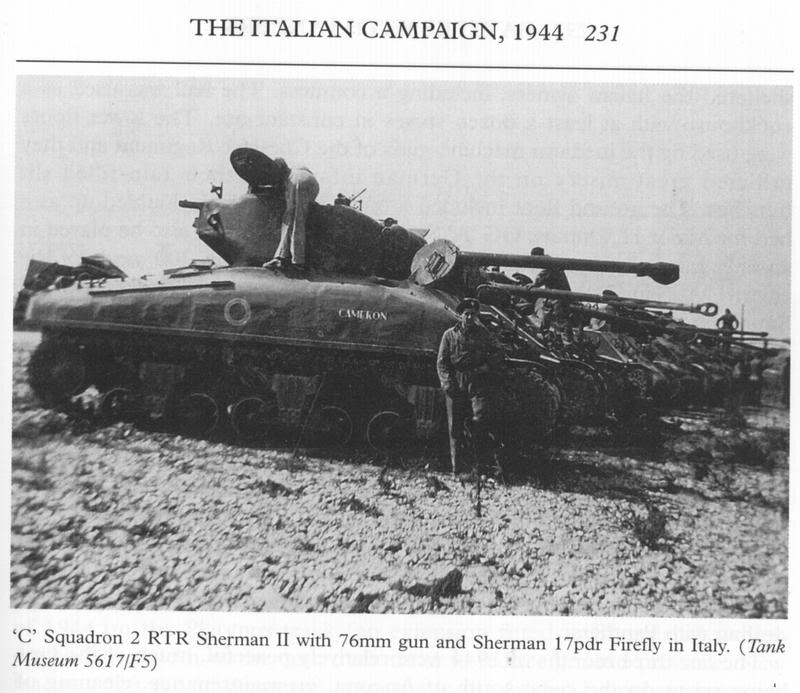
Superb Shermans
First up, two different flavours of Sherman squadron. The normies may know the Sherman is a tank, a river counter will know their cast hull, big hatch, from their wet, welded, hull, but a Flames of War player will quickly work out that a Sherman squadron can be a very different beast in the hands of different nations.
Both the South Africans and New Zealand Armoured Divisions started off as Infantry ones, but they quickly adapted to their new role, largely following the standard British doctrine. That said, both made some adaptations.
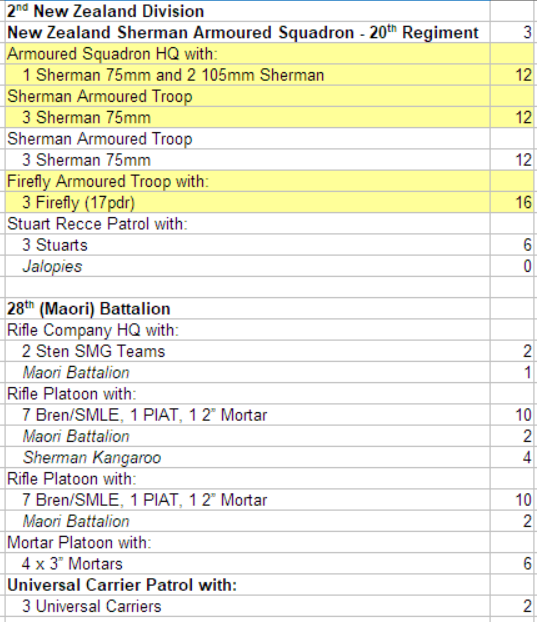
The “2nd New Zealand Division” card grants even our “dry hull” Shermans a 3+ remount, but it comes at the cost of removing our access to the 76mm Sherman and making the Firefly troop accessible only at the “cost” of not having Fireflies in the line troops. That is perfectly acceptable though, as it concentrates the anti-tank capability of the Fireflies and allows the standard troops to focus on anti-infantry work. The card can also be used alongside other NZ title cards like Maori, giving us some pretty fierce assault troops.
The force is built around two formations. The Armoured squadron has a core of two platoons of Sherman III (the favoured type of the Kiwis due to the belief that it brewed up less easily thanks to the Diesel engines). The 75mm is still more than useful for dealing with all the looted Semovente we will be seeing whilst the 3+ firepower digs out infantry. The HQ has a single Sherman III, plus a pair of Sherman IB to provide some smoke and direct HE. We then add a Firefly troop to provide some AT support and a Stuart troop with the Jalopy card to do some recce. That leaves us with 39pts to spend.
The second formation is a company of Maori. A HQ and two platoons of rifles provides a form foundation for the formation. One of the platoons also gets some Sherman Kangaroos to ride in. A mortar platoon provides another template and more smoke whilst a Carrier platoon provides some cheap MG fire and an extra spearhead.
This is quite an aggressive force, set up to get in the enemy’s face with some fine assault infantry but having the option of going defensive in a Manoeuvre stance if needed.
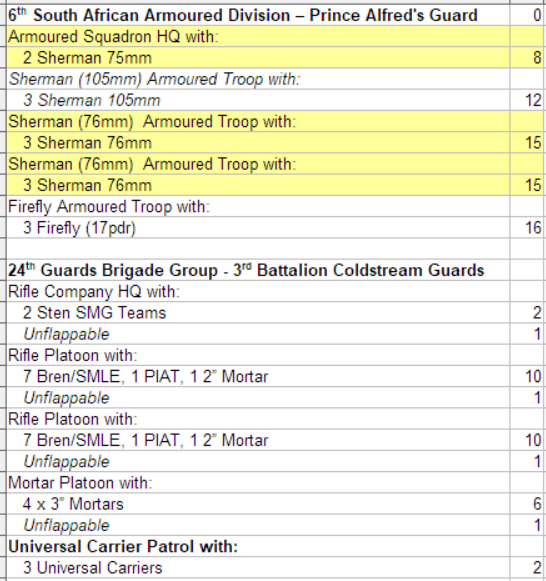
By contrast to the Kiwi’s, the South African list is more measured force that combines South African armour with Guards infantry thanks to the “6th South African Armoured Division” card allowing its use with the Guards “Unflappable” title. That also gives the opportunity to model some Guards infantry in camo smocks!
Here we have a very similar infantry formation to the Maori, just with the “Unflappable” trait giving a 3+ Rally to join the normal 3+ Counter Attack. That will keep the infantry driving forwards, no matter enemy suppression.
The Armour Squadron uses the unique South African “Sherman (105) Armoured Troop” to concentrate the fire of the Sherman 1B into its own troop, making for a far more useful bombardment. We then have two troops of Sherman IIA, 76mm armed tanks. The 105mm need to do the majority of the leg work when it comes to dealing with guns and infantry but the 76mm can deal with infantry at a pinch and certainly can put the AT12 and FA7 to good use. A troop of Fireflies ensures any Panthers or Tigers are kept at bay.
Poor Bloody Infantry
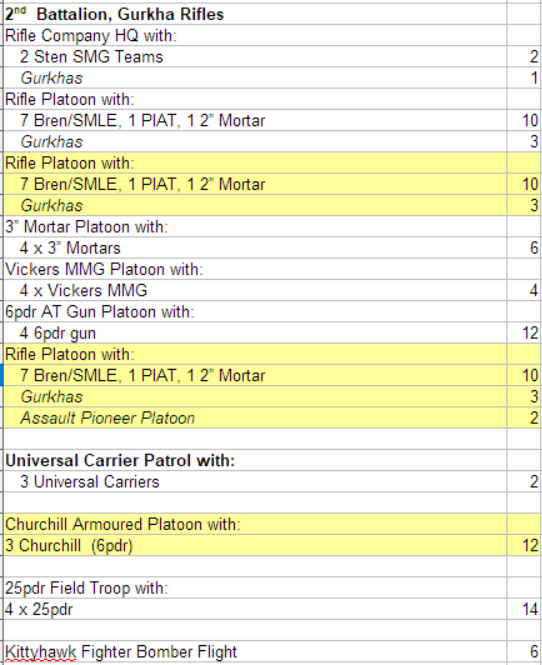
Of course, Italy was really an infantry show so let’s finish up with a single formation infantry force. The infamous Gurkhas provide all the benefits of Indian troops, combined with a 2+ assault ability and Mountaineers. Perfect for clearing out a ridge line off German infantry!
A HQ and two platoons burns points quickly but thankfully the Carriers, Mortars, Vickers and 6pdr don’t have the Gurkha premium. An additional Rifle platoon is then added in the form of the Assault Pioneer platoon, giving a unit that can push through minefields and flush out infantry with a flamethrower.
To support all this we add a platoon of 6pdr Churchills. I wanted to get the later 2×75 / 1x6pdr platoon, but the points add up quickly with the Gurkhas! Still, the 6pdr has APDS and HE so is still more than adequate for dealing with most tanks I’m likely to face. Still a flight of bomb armed Kittyhawks are a useful addition to deal with anything larger.

A battery of 25pdr round out the force, providing additional smoke and HE to cover the assault and soften up the enemy lines before the Kukris finish the job. I see this force as being on the attack the majority of the time but a Defend/Defend mission could see these do very nicely too in the new pack.
So, there you go. Some ideas for three different British forces to tackle the soft under belly with!
Post Comment