Building a Better List: US Bulge Shermans

With shipments of US reinforcements being delivered around the world, I felt that now is a good time to delve into the US Sherman (Late) options. As always with this series of articles, I start with a health warning. Firstly the aim here is to look at the most competitive build of these formations and secondly this comes with a strong dose of opinion. The great thing about FOW is that there is no perfect list and while I hope these ideas will give you an edge, people will immediately see a counter (and so the Meta dance continues).

Sherman Formations
The Bulge comes with two versions of the Sherman formation. The basic has the stats below across it’s core units;
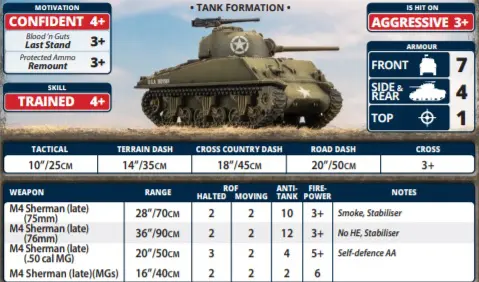
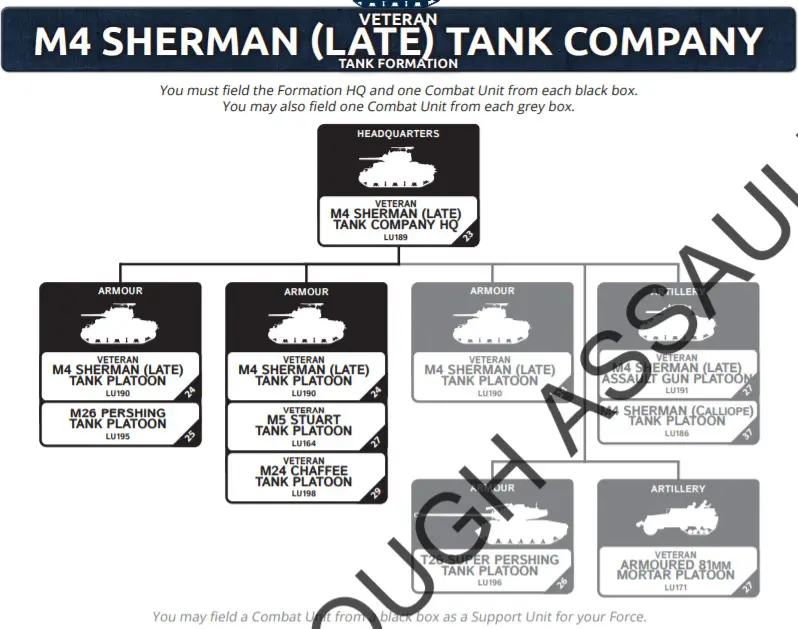
The “veteran” version comes with a wider force diagram with the inclusion of Pershings and a Super Pershing. It’s core units have these stats;
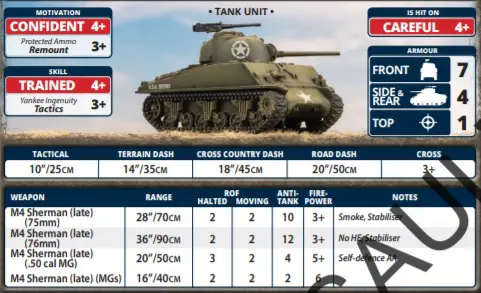
The key thing here is that the veteran formation is cautious, and this is a huge deal in FOW, where an old saying is the ‘the best armour is not getting hit‘, therefore a 4+ to hit is a huge advantage. The second difference is that the Vets get yankee ingenuity giving them a 3+ tactics (big for blitz and shoot and scoot) whereas the basic formation gets blood and guts for a 3+ last stand. Frankly I will take the tactics buff any day. The issue with the last stand roll is that you have already suffered a lot of casualties to get there and this is even more likely to happen with aggressive tanks. The 3+ tactics can be useful in any turn.
In basic terms five Sherman (Late) is the same cost as four Veteran Sherman (Lates). Interestingly the upgrades to the units are the same cost. This places the aggressive list, statically at a big disadvantage. For instance, a 76mm Jumbo is 87.5% the cost of a Veteran one. However a straight 75mm (Late) Sherman is 80% the cost of a Veteran Sherman (Late). Mathematically the more you add options to the Bulge Shermans the worse they are in terms of points vs their Veteran brothers.
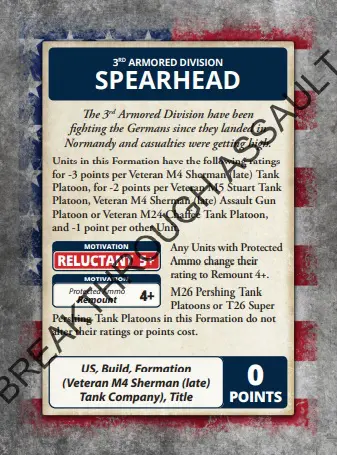
Therefore my conclusion has to be that Veteran Shermans are optimal for a competitive build. That said, let’s throw another option into the mix, the 3rd “Spearhead” Armoured Division (3AD).
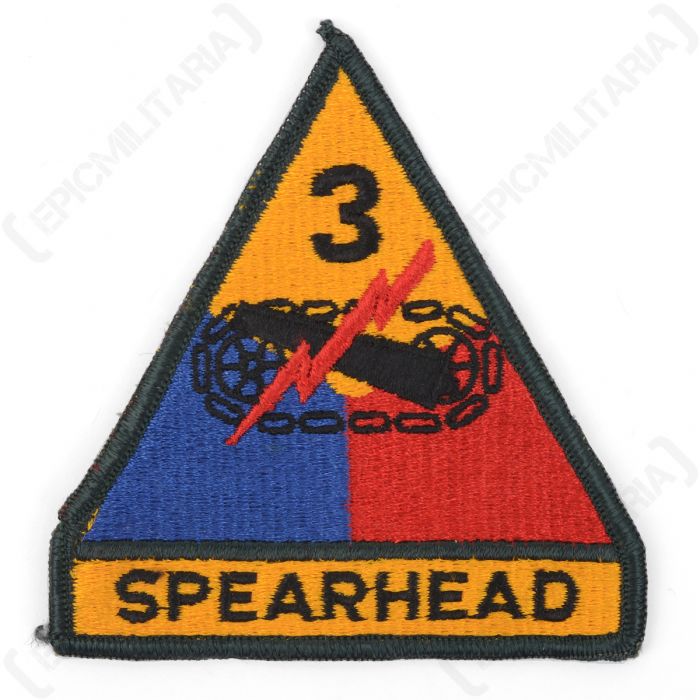
The 3AD is a command card applied to the Veteran Shermans which makes them reluctant (with a 4+ remount due to protected ammo).
With a saving of 3 points per Sherman (Late) platoon and 2pts per Chaffee, Stuart or 105mm Sherman platoon and 1pt for everything else, this allows you to squeeze a lot more into your list. Reluctant is a problem though. You still have a respectable remount and last stand is always dicey, however you are now making them quite poor in assault. I would argue that my expensive Shermans don’t really want to assault Panzerfaust packing Germans and there are other tools that can help that.
So, lets compare platoon composed of 76mm Veteran Sherman Late and a Jumbo 76mm, all equipped with HVAP, in the three forms:
Sherman (Late) Platoon = 24pts
Veteran Sherman (Late) Platoon = 28pts
3AD Veteran Sherman (Late) Platoon = 25pts.
For a 11% reduction in points vs the basic Vets, I become reluctant but perhaps saving as much as 12pts in a formation. I really like that, therefore my second conclusion is that 3AD is my go to competitive Sherman (Late) build.
George S.Patton Jr

Okay we all know him and we (US players) all love him. There has been some confusion about this card online, therefore I will clarify a few things based on some stuff Phil has weighed in on & things people are getting confused about.

- Patton is a force card, he isn’t part of a formation (note that there is no formation key word). Therefore he isn’t in a tank on the table, he can’t be killed and affects all formation HQs from your Bulge book. I.e. if I take a Sherman and a Battle Weary Rifle formation both HQs get the 8 inch bubble.
- The 8 inch bubble special rule is separate and in addition to the 6 inch formation commander bubble (which does some different stuff). I.e. your formation HQs can’t start causing re-rolls to remount out to 8″, only their normal 6″.
- The card says when the unit leader is within 8″ and LOS of their formation commander…. therefore support units don’t benefit. While a formation commander as per the main rule book can affect support units with their 6″ command bubble, this is a separate rule. Don’t confuse the 2+ rally/remount with the core HQ ability any force has.
Patton is perfect for the 3AD, the 2+ remount will really keep the units going and partially mitigates 1 of the 3 main drawbacks (remaining 2 are last stand and counter attack). Also a re-roll for a reserve dice EVERY turn is a bargain and especially important with expensive upgraded Sherman units.
He is pretty much an auto include for me.
The lists
I am going to present two options for what I think are competitive 3AD builds. Each does something a bit different and all have separate strengths and weaknesses. There is one thing which is key to remember; if you are going to take AT13 HVAP rounds always take an even number of 76mm guns or you are wasting points. Also remember that the card doesn’t allow HQ units to have the upgrade (hoping to see this changed in LFTF).
List 1
3 AD
Sherman (late) 76mm x 2 – 12
Sherman (late) 76mm x 3, Jumbo 76mm x 1, HVAP x 2 = 25pts
Sherman (late) 76mm x 3, Jumbo 76mm x 1, HVAP x 2 = 25pts
Sherman M4 75mm x 2, Jumbo 76mm x 1, 1 x Sherman (Late) 76mm, and 1 x HVAP= 20pts
3 x armoured mortars – 2pts
Patton – 4pts
3 x Priests – 8pts
Short M8 Greyhound Cav Recon Patrol – 3pts
Lucky – 1pt
100pts
This list is really pumping out the Jumbos with three 76mm ones on table. By playing around with the third platoon, I could have got another into the HQ but I find they make less of an impact there.
With this list you get 10 AT13 hulls with stabilisers plus 2 x AT12. The two M4s are also useful for targeting anti tank guns or firing smoke. I added the Priests instead of infantry because it negates all the anti infantry firepower the enemy possesses (mortars, HMG, etc). I always find one platoon is too easy to take out. However Priests have a veteran skill and FP3+ with Time On Target (TOT) meaning they can quickly dig out infantry and guns, plus a second smoke bombardments allows you to protect and screen your force.
As with all the Sherman lists you can’t be reckless; plan ahead and use cover. Don’t be afraid to use blitz on a 3+, ROF2 AT13 is impressive.
The nemesis of this list is a defending infantry list with lots of guns and integrated AT. Mitigate that by choosing maneuverer as your battle stance.
List 2
3 AD
Sherman (late) 75mm x 2 – 10
Sherman (late) 76mm x 3, Jumbo 76mm x 1, HVAP x 2 = 25pts
Sherman (late) 76mm x 3, Jumbo 76mm x 1, HVAP x 2 = 25pts
5 x Chaffee – 17pts
3 x armoured mortars – 2pts
3 x Callopie M4 – 6pt
Patton – 4pts
3 x Priests – 8pts
Short M8 Greyhound Cav Recon Patrol – 3pts
100pts
There are two main changes here; Firstly third platoon is now composed of five Chaffees to drive a more aggressive play style. These light tanks packs a respectable punch with AT10 but they are very fast and can threaten most things, if not from the front then from the side. They also have HE so they can start engaging guns while their bigger brothers engage the heavies. Secondly you get three Callopies. They are downgraded to FA6 (if someone is shooting them with something above AT7 then I have bigger issues!) for the saving of 1pt and 3AD drops them further to 6pts. That makes them an interesting choice; while only FP5+ a salvo template can stop infantry moving across ground in their tracks and it is a great area denial tool when it starts ranged in. Do you really want to risk that platoon under the that template on the objective, and then get a TOT Priest on top, plus some mortars? The draw back is the loss of the two 76mm guns from the HQ, however the 75mm is great for smoke and shooting guns. Overall this will serve you better if your local scene is more infantry focused.
In summary
The Sherman formation is a varied beast with tons of options. You will notice I haven’t touched the E8 and that is because I am already paying 25pts for 4 tanks and, while a 4″ semi auto blitz is nice, 1pt per hull is very expensive when it is largely situational. Also you aren’t going to get everything you want. I have gone without infantry favouring recce and artillery instead; others may think differently.
Regardless, what is clear is that Veteran Shermans, when upgraded, are better value than their aggressive brothers and, for me, 3AD saves a lot of points (11pt in both lists). In essence it bought me Priests and recce and I really think that is worth it.

24 comments