Musings on the SS Book Scenarios

Martin takes a look at the new scenarios contained in D-Day Waffen-SS.
With the release of D-Day Waffen-SS, we get another set of linked scenarios combining two existing scenarios with three new ones forming a mini-campaign for your chosen D-Day forces, so that’s a potential twelve new scenarios to play from the D-Day releases. The three new scenarios introduced in D-Day Waffen-SS are again somewhat different from what has gone before in the other D-Day books.
I’m really excited by this particular set of scenarios as I believe they will make for some really interesting challenges for players, not only in how they play but, also, in how you think about and construct your force to try them out. You can play these three scenarios with pretty much any two opposing forces unlike some of the other D-Day scenarios. In this article, I’ll do a quick overview of the idea behind the scenario then look at them individually in more detail.
So what are they? First up we have Encirclement representing one player trying to cut off and encircle an overextended enemy advance, the mini-campaign has the SS as the attacker but will work well with any nations forces as the attacker.
Next, we have Gauntlet, where orders to withdraw come too late and the attacker continues with an advance toward the objectives whilst the enemy attempt to cut-off and crush the advance an alternative setting for this that would work well is the Eastern Front with Soviets on the attack or even to represent the British advancing towards Arnhem.
Finally, we get Into The Unknown where both forces seeking to grab objectives in blissful ignorance of the enemy, again this works pretty well for almost anywhere. Each of the scenarios presents unique challenges and introduces new elements into the regular FoW scenarios. In all cases, there are no new special rules to remember but there are some interesting deployment requirements and reserves placement options used.
Encirclement
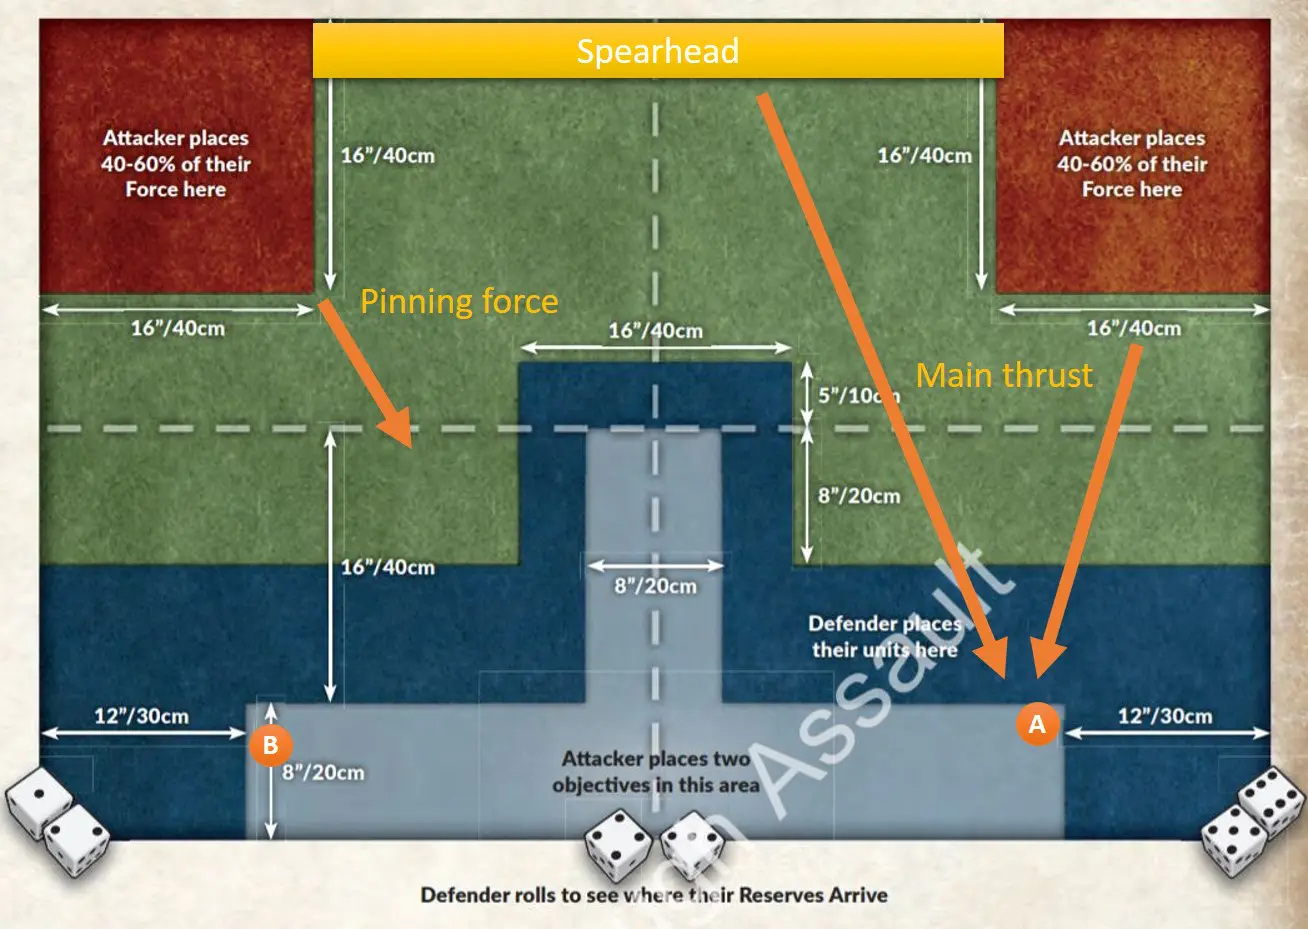
Encirclement provides several new challenges to players, as an attacker, the obvious one is how should I break my force down? We are used to planning for having a reserves part to our forces but how these come into this scenario is subtly different. Instead of coming in to bolster your defensive position now you need to organise your force on the tabletop into two isolated groups.

If we took a common approach with German forces of having a force containing a 3 tank Tiger platoon, which many players will consider ideal for their reserve element. In this scenario, you have to decide if they are strong enough to risk deploying unsupported or if you add extra units to their deployment box is the rest of your force strong enough for the second deployment area?
This brings me on to the second challenge. How do you maximise your strength at the point of attack on the enemy line? One thing I noticed is that the deployment zones are sized so as to allow the lateral use of spearhead troops by the attacker between the deployment zones and they have the benefit of deploying second which gives the attacker a great deal of flexibility in choosing the line of attack whilst the defender will have to cover a line of assault based on both deployment zones.
This leads me on to the next interesting thing about where you might place the objectives. Ideally, you want them as close as possible to you but by placing one of them in the forward prong this may make it easier for the defender as the board will inevitably get biased to one side or the other by the second objective position. In this scenario that’s what I will do most often, it will open up space to allow a mobile force to exploit the side of the board furthest from the objectives, creating I hope the chance to sweep around behind my opponents forward elements.

If you are going to spread the objectives then leaving a token force in place in the weaker deployment area to pin the enemy into their battle line will enable you to maximise the attack against the other objective. If your opponent has made use of the forward deployment portion in the centre you can look to use their troops to block lines of sight to your attacking platoons from troops on the opposite flank.
As a defender, this looks a tough scenario and deployment could settle everything. You will only have 60% of your force available and will potentially have to cover both flanks. Consider placing any turntable guns in the centre of the table so they can swing to either flank, look to create a pyramid defensive formation with a hardened point and keep your most mobile troops in your rearmost or flank areas ready for an early counter-attack if the opportunity arises.
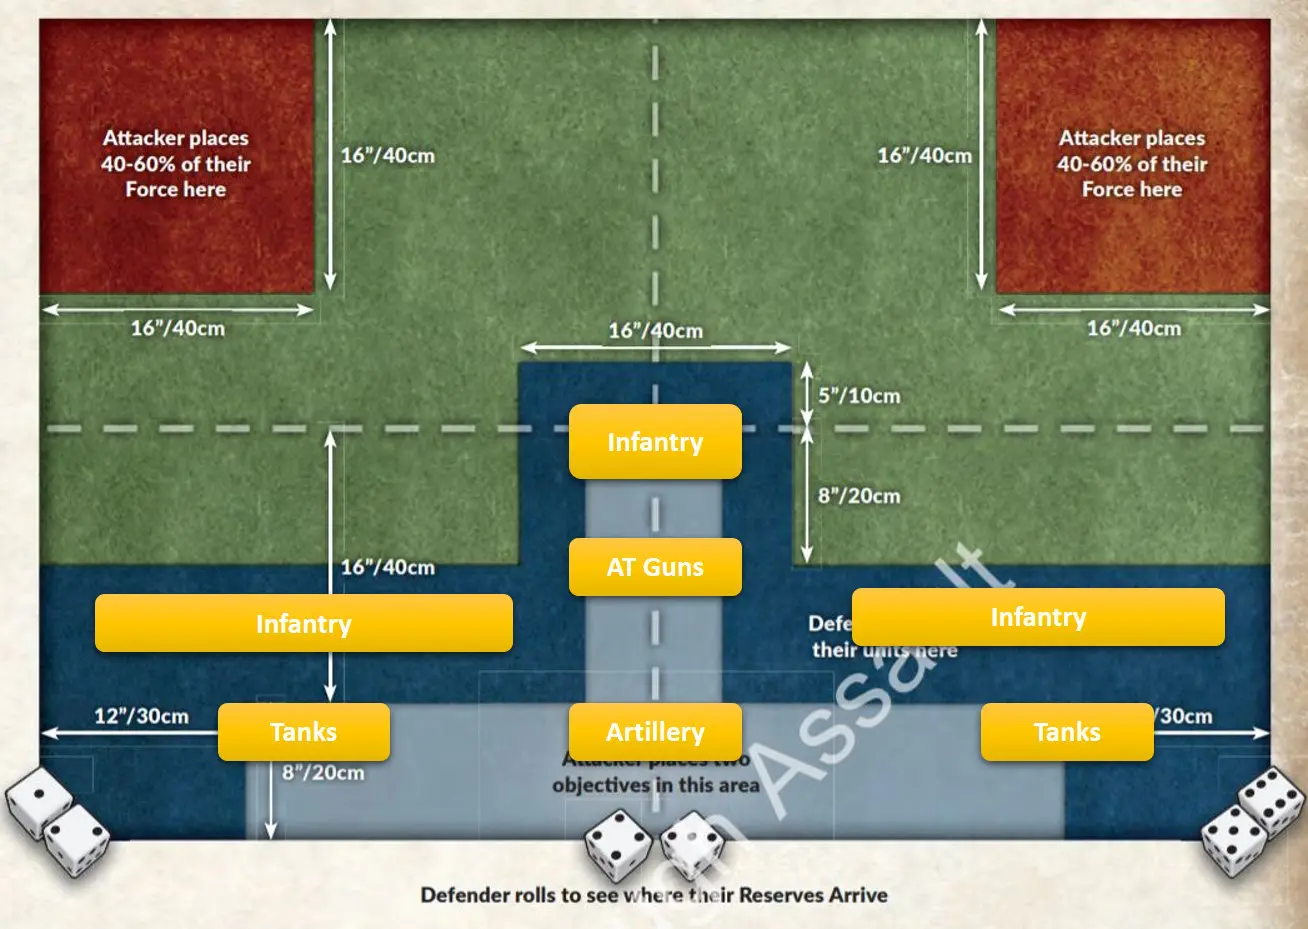
You will have to be aware that your opponent can strike in turn 1 against units placed in the forward projecting deployment space so if you use this, make sure you have sufficient strength to hold off an assault (the hardened point above). A well-equipped unit of panzergrenadiers or an American ARP could make a good choice of the unit to deploy here, even pinned they will stop most infantry assaults and with panzerfausts and panzershrecks or bazookas can deter or even stop a tank assault.
If the terrain works out then supporting these with your ambush unit can create a solid position which will be hard for your opponent to dislodge. As you can only win the game at turn 6 the longer you can hold this forward position the harder it will be for your opponent to get near any objectives placed further back this becomes more critical if both the objectives are placed towards the rear of the table.
Reserves timing as the defender is less of an issue being immediate but the scattered nature could prove problematic, you need to deploy with the intent of trying to hold the enemy off until their turn 3, obviously, if reserves arrive sooner this should become easier to achieve.
Gauntlet

This is another interesting scenario, As the attacker, the single powerful reserve platoon option in your list is your friend in this scenario, as the attacker they will arrive by turn 3 before your opponent even starts to roll giving you an opportunity to get in and win quickly.
For the defender, this also looks a good force building route to take especially as your reserves are delayed but there is also the added problem that your reserves could arrive away from the objective so choosing where along the edge to bring them in from is going to be a critical decision if you need to get to the objectives in the same turn. It might be beneficial to start further away to use dash speeds rather than starting them as close as possible, you would need to move at least 20″ to get to near an objective and that’s not easy to do without making a dash move anyway.
As the attacker, you don’t really want to go first with the Meeting Engagement rule so some patience will be needed. If I am attacking in this scenario unless I have a powerful enough unit that is fast enough to gain the objectives in turn 1 then I will happily sacrifice moving/shooting in the first turn to dig in my artillery teams and simply go to the ground knowing my opponent has to move to protect the objectives and I will get a turn of shooting at them potentially in the open.
The defender is hampered by having delayed reserves against immediate reserves so as the attacker you have time on your side and should be able to build up a numerical superiority before seriously advancing, whilst your opponent manoeuvres to get units in place to protect the objectives.
One thing as the attacker you will have to watch for is powerful assault defensive units placed in the deployment areas near to your own deployment area, being only 16″ apart could enable these troops to launch a turn 1 assault if you don’t deploy carefully. You should be able to avoid this easily enough especially as the defender has to deploy their forces before you even decide what your reserves will be.
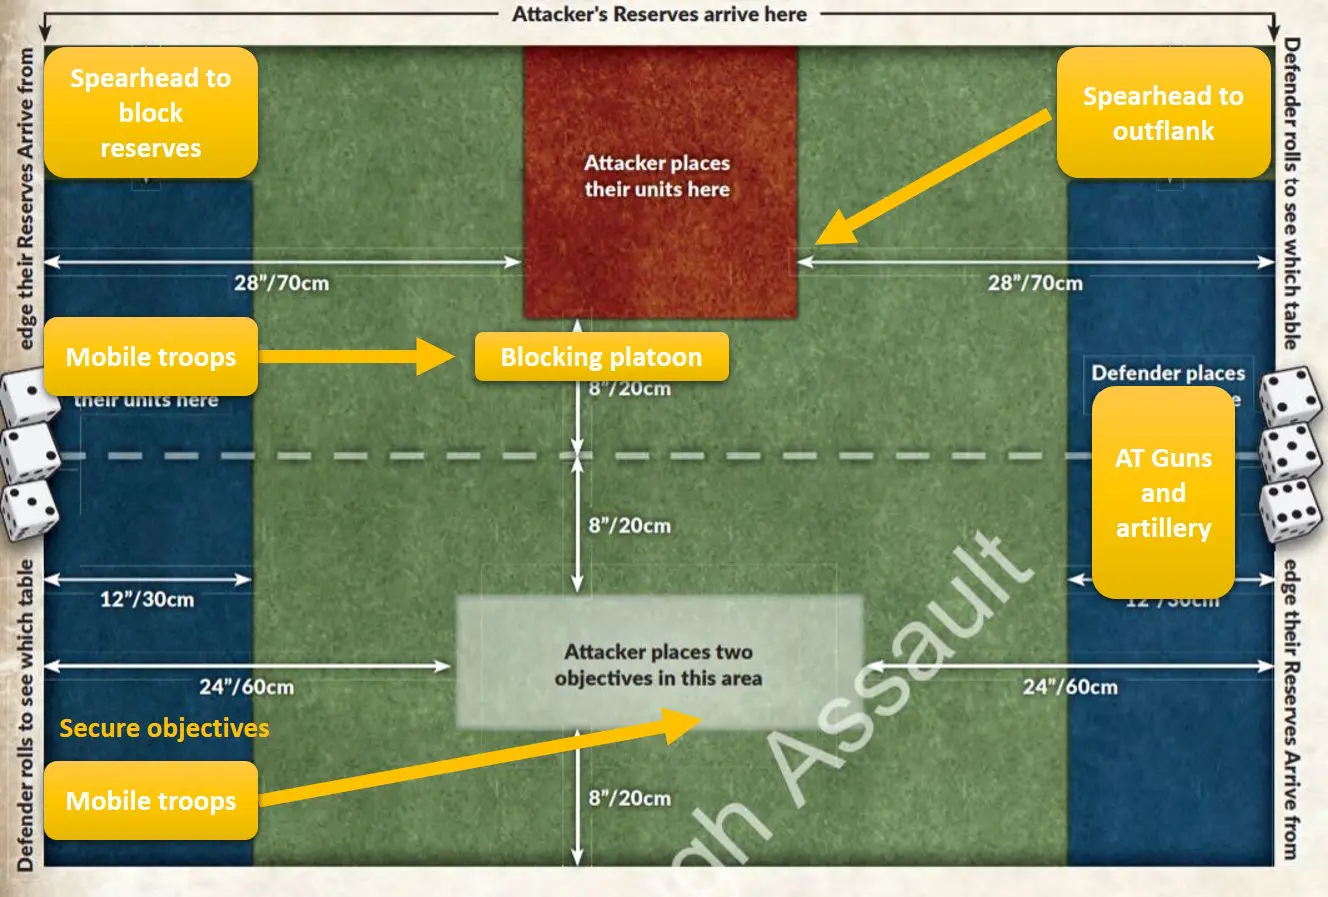
As the defender in this scenario, there are a few things you can try to do if you have any spearhead units you can use these to extend your deployment right up to the opponent’s baseline this may enable to get round behind their attacking platoons and threaten their supporting artillery units or just deter them from bringing reserves on in this area.
Another option to consider if they go for the build-up of numbers type of plan is to put a sacrificial blocking platoon between the deployment area and the objectives creating a speed bump that your opponent will have to engage before advancing toward the objective, at the very least you will stop them moving at dash speeds. Doing this might also prevent your units from moving to secure the objectives coming under as intense fire as they might otherwise.
If your opponent moves to engage these in assault you can elect to break off rather than counter-assault thus slowing their advance down possibly for a couple of turns bringing you nearer to when you will start to roll for your own reserves. Command Cards that can either delay reserves or provide an enhanced chance of getting reserves can be a big help to the defender in this type of scenario with offset reserves and are always worth considering.
Using cheap platoons to slow down the enemy advance even if they are subsequently lost cant be a worthwhile sacrifice. As the defender, your role is to make the attacker make choices. Placing a few teams so as to prevent free movement and to only conceded ground by limiting them to 2″ for a charge and 4″ to consolidate can sometimes be more beneficial in the long term than letting the enemy move forward at will. If your opponent stays still and elects to fire instead that’s even better as they can now only move 4″ forward if they can manage to Shoot and Scoot (A quick podcast plug!). You are buying time to get your reserves in play and get closer to the winning line.
Into The Unknown

This is a 50/50 scenario, spearhead units won’t help either player and the single big points reserve lists will have an edge favouring the high cost German and Soviet tank units held in reserve over the cheaper British and American platoons. A force with plenty of mobility is going to be useful a Pak front may not be of much help in this deployment set up.
This is definitely a game where losing the die roll to go first looks like it could be beneficial as it is often easier to react to your opponent rather than set the pace, especially for less experienced players. Personally I can’t see much fighting happening in the opening turns of the game with this set up both players will want to dig in once they have moved to secure the opponent’s objectives so that’s a couple of turns done and artillery will need to get ranged in as well.
I would be looking to defend the objective on the short table edge from in front of it to bring my units closer to the enemy and potentially using them as my initial assault wave, later on, the objective by the long edge would be where I’d probably look to get any mobile gun platoons. I’ve illustrated this below.
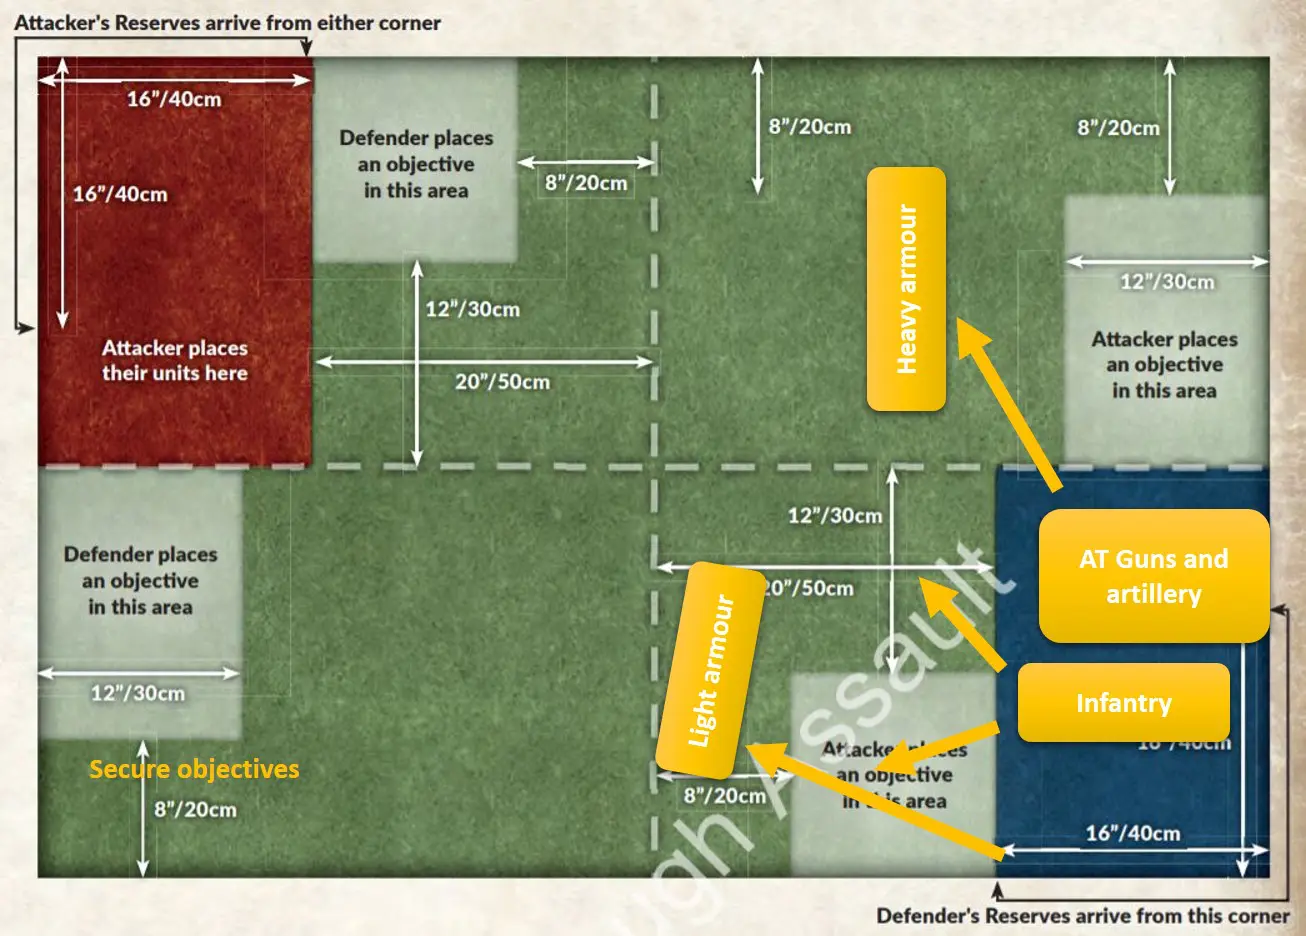
For me, the key decision will be when to start to attack and my feeling is that this won’t be until turn 3. You won’t want to advance until you are at least rolling for reserves to feed in behind your leading units and to cover the objectives in case of an enemy breakthrough. A smoke barrage to screen your attack will be more than beneficial.
I feel on paper that the player going second will have the slight advantage as the pressure will be on the player getting their reserves arriving first (which should be the attacking player) to launch the first wave of attacks the risk is that they go too soon or that their opponent gets multiple reserves in a single turn enabling them to crush any assault wave and have enough strength left to take the objectives.
Overall I think this could be a bit of a slow scenario to play with a lot of pondering of what to do and how to do it, more akin to a high calibre chess match than either of the other scenarios in this book. Good use of terrain and smoke (if you have it) is going to be critical in making a successful push onto an objective.
So that’s it three new and challenging scenarios, give them a go and let know how you get on.
