Faces, Bases, Something, Something: Perfect Panzer Painting
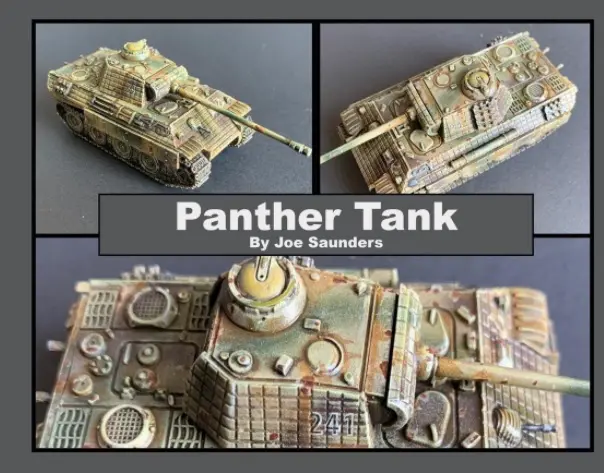
Today Joe Saunders returns by popular demand to share more modeling tips. This time how to paint your German Panthers (or any German armour to be honest).
Advanced painting Techniques for Tanks in Flames of War

Every once in a while, you have to pull out all of the stops on a project! Sometimes a model just speaks to you and you want to test the limits of your painting skill. One of the best aspects of playing Flames of War is that it can be enjoyed both as a game and on the visual level with beautiful models. Also, because art is subjective and since model painting effectively has nearly an infinite variety of techniques, the process can be as fascinating as the final result. In this article I will go over my method for creating centre piece models that will add a degree of realism to your units and hopefully turn some heads whether they are on the games table, sitting on a shelf or in a diorama.
Techniques and Materials

In order to get the best results, I have incorporated several classic miniature painting techniques such as dry brushing and layer painting with techniques borrowed from scale modeling such as enamel washes and blending. I also use an airbrush extensively. If you do not possess any one of these tools simply substitute an appropriate technique. The purpose is not to make it so you can duplicate this paintjob (if you don’t want to) but understand what can be used to achieve similar results on any model. Below is a list of the tools and paints I used.
| Airbrush & Compressor | Water | Vallejo Model Air: Earth Yellow |
| Airbrush Thinner | Mig Enamel Filter for Dark Yellow | Vallejo Model Air: Ivory Sand |
| 000 Paintbrush | Mig Dark Wash Enamel | Vallejo Model Air: Armour Brown |
| #2 Paintbrush | Acrylic Matt Varnish | Vallejo Model Air: Cam Dk Green |
| Dry Brushing Brush | Acrylic Gloss Vanish | Vallejo German Yellow |
| 2 Pipettes | Acrylic Satin Varnish | Vallejo Hull Red |
| Airbrush Cleaner | Vallejo Model Air Black Primer | Vallejo Iraqi Sand |
| Mig Enamel Thinner | Vallejo Model Air DK Yellow Primer | Game Colour Earth Brown |
| Plastic Mixing Cups | Black Acrylic Paint | Army Painter Dark Tone |
| Paint Palette | Yellow Acrylic Paint | Army Painter Flesh Wash |
| Testors Rust Wash | Red Acrylic paint | Paper Towel |
| Testors Decal Set | Vallejo Model Air: White | Smokey Tint Game Colour Ink |
| Vallejo Decal Medium | Vallejo Model Air: Blue Grey | 2B Pencil |
The Painting Process
With the materials for the job collected, it is time to get down to the individual steps in the project. I have listed them in order below.
1. Build and Prime the Model: Prepare the model as per the assembly instructions. If you wish you can add extra stowage and details. I wanted the model to have some battle damage so carved away a few side skirt panels. I used Vallejo Model Air Black Primer in my airbrush to prime the model. I used gloss paint, but matt would work. You may need to do several coats.

2. Base Coat: Using my airbrush I sprayed a light coat of German Dark Yellow (Dunklegelb). I avoided the tracks and other non-yellow details and kept the coat light so the black primer created shadows. As I approached the edges of the fender, glacis, gun mantlet and upper hull (which was not covered by the turret) I layered in more paint so the effect would be brighter where the highlighting goes.

3. Airbrush Highlights: Using the airbrush, I sprayed Earth Yellow in a thin coat making it heavier near the edges and left it out of the very dark areas where not as much light would reach the surface. I then repeated the process with Ivory Sand focusing only on the very edges of armour plates or prominent features like hatches and engine covers. The objective is creating a gradient of colours from black in the recesses up to Ivory Sand on the upper surfaces.

4. Camouflage Pattern: With the airbrushI sprayed wavy lines in Camouflage Dark Green, Then Armour Brown on the hull and turret. I tried to match the pattern up on the turret and the hull so it looked like they were painted at the same time.

5. Dry Brush Highlight: Using an old large bristle paintbrush I first highlighted the edges and prominent details by dipping the brush in German Yellow paint and running a flat side of the brush over the edges of the hull and turret. Then I wiped the brush off with paper towel until it just had trace amounts of German Yellow and lightly dry brushed it backwards from the highlighted edge towards the centre of the model making sure to catch any raised surface features. When using paint for this purpose DO NOT thin it with water. (The thicker the paint the better for this step.)

6. Decals: I decided to use a 3-digit unit number on either side of the turret and a unit marking on the upper right side or the front. I started by painting gloss acrylic varnish on the model where the decals would go. The gloss backing makes it easier to place the decal and “hides” the glossy edges of the decals when they are on the model (called silvering). I soaked the decals in water in a mixing cup while I brushed Testors Decal Set on the now dried varnish. Once the decals were soaked I slid them off the backing onto the prepared surface with my fine brush. I dabbed the corners with paper towel to remove excess water and then lightly brushed Vallejo Decal Medium over the decals. This softens the decals so they conform to the texture of the surface of the model. I then left this to dry for at least an hour.
7. Satin Varnish: With the decals on the model and everything dry, you need to prepare the way for using enamels. I used my airbrush and added water and airbrush flow improver to the satin varnish (I mixed it in a separate cup). I used my pipette to transfer about 10 drops of varnish to 4 drops of water with 3 drops of flow improver to the airbrush. (This will however vary by airbrush and products you use). After testing the mix on some paper to see that it flowed smoothly, I sprayed 2 thin layers on the model allowing time for the varnish to dry between coats (which is not more than a couple minutes.)
8. Enamel Filter: After shaking the bottle of Mig Enamel Filter for Dark Yellow, I took my larger brush and brushed it onto the model’s surfaces straight from the bottle. It goes on very thin and applies to the whole model (that has been painted). After this was done, I put a little varnish in a mixing cup and used it to clean the brush. I then left the model to dry for several hours.

9. Pin Wash: Using Mig Dark Wash, take a small brush and outline the edges of the tank panels, edges of hatches, raised details etc. Keep a separate pool of thinner on your pallet to add to the Dark Wash as you go. By adding thinner you can decrease the surface tension of the wash so capillary action will cause the enamel to spread out around the details. In very dark areas you can spread the Dark Wash out to create a shadow. Wait a few minutes for the wash to partially dry then take a larger brush and moisten it with clean thinner. You may want to use paper towel to dry the bristles slightly. Now you can go to any areas where your wash has pooled (where it is not supposed to be) like on flat surfaces, or into shadowy areas and either erase it altogether of blend it subtly. Draw your brush towards the area where you want the darkest area to be. After this, I mixed the Filter for Dark Yellow with Dark Wash in a ratio of about 4 to 1. With this I lined-in the gaps around the Zimmerit (squares on the armour of the panther.) I did not use pure Dark Wash because it would draw too much attention to the Zimmerit and darken the whole model too much! With this done I cleaned the brush as in step 8.

10. Top Highlights: The process of applying the pin wash and the filter will darken the overall tone of the model. Now it is time to go back and renew the highlights. Using German Yellow, repeat step 5. With the varnish added earlier, the surfaces will be less likely to take on the chalky textures. After the dry brushing was done, I mixed equal amounts of Air Effects White with German Yellow to make a very pale yellow with a thin consistency. Using my finest brush, I then painted this onto the extreme corners of the armour plates and anywhere where the sun will reflect on the tank.

11. Light Chipping: The panther now looks like it is almost brand new so it needs some effects to make it look like it belongs on the battlefield. I mixed 50% Air Effects White with 50% Iraqi Sand on my palette and added a few drops of water to make it thin but still opaque. The colour should be close to the final top highlight but a different tone (being more beige than yellow). Using a fine paintbrush, I paint scratches, dots and irregular shapes where the wear would be on the tank. Fenders and corners of track skirts are good locations for this as well as around hatches. These should appear fairly bright and can be used to cover any errors you have made previously.

12. Dark Chipping: Using Hull Red with a few drops of water in it, I took my small brush and added irregular dots of colour to the centre of some of the scratches and chips we painted above. Do not apply the colour to all of the chips or scratches, but only where you think the most wear and battle damage would accumulate.

13. Rust Effects: Using Game Colour Smokey Tint acrylic ink and a fine brush I painted areas around features where I though rust should accumulate. I also drew wavy lines away from these points in some spots to indicate stains from rust, oil and other spills and mud. I used special attention to create streaks that looked like they were originating from the biggest chips. When this was dry, I took Testors Rust Wash and layered it over and around the rust spots and some of the larger chips. Once this was dry I used thinner to blend the rust wash into the surroundings to give it a rust coloured tint.

14. Clean up: Next I decided it was time to work on the fine details. To do this I added Air Effects Blue Grey in equal quantity to black acrylic paint. This created a very dark grey/black. Taking both large and small brushes (where appropriate) I painted this on the tracks, tools, exhaust, machinegun barrel and anything else that was not painted like the tank hull or turret.

15. Exhaust: Using Earth Brown I stippled the paint on the exhaust pipes. I also stippled with hull red, red acrylic paint and yellow acrylic paint in small quantities layering it unevenly darkest to lightest.

16. Tracks: I now took Earth Brown, and without adding water, dry brushed it onto the tracks and road wheels. I also stippled this onto the lower areas of the hull where mud would splash and on the fenders. After this had dried I repeated the process again with Iraqi Sand. Following this I Used Army Painter Dark Tone straight from the bottle and using my large brush, dabbed it onto the road wheels. I then left this to dry.

17. Tools & Dust highlights: While painting the tracks I also painted Earth Brown on the tools using a fine brush then highlighted this with Iraqi Sand. After it dried, I washed the tools with Army Painter Flesh Wash. Lastly, adding 50% Air effects White to 50% Iraqi Sand I made a very pale dust tone. I then dry brush this over the road wheels and stippled it onto the lower surfaces where dust would collect.

18. Metallics on Tracks and Tools: Using a 2B (soft graphite pencil) I coloured over the raised track cleats, machine gun muzzle, metal tools, openings in the exhaust pipes and rims of the road wheels.

19. Matt Varnish: The work is now complete and I spray on 2 layers of matt varnish with my airbrush, allowing for drying time between both coats (prepared as outlined ins step 7). This will protect the model and tone down any of the effects where enamels appear glossier than the other colours.
The Finished Product
With the work done the panther is ready to hit the field. I hope that the process gives you some ideas and new techniques you can try out on your own models. Remember that the artistic side of our hobby is all about pushing yourself to improve with each new project so that you can become the best painter you can be!


3 comments